How to Schedule Automatic Shutdown on Windows 10
- Kalpana
- Aug 11, 2020
- 1 min read
1. Press the Windows key once and type “Task Scheduler” in the search box. Now, click on the first result.

2. Next, click on “Create Basic Task” located in the right pane.

3. After that, give a name to your task and click on “Next”. For example, I have entered “Automatic Shutdown”.

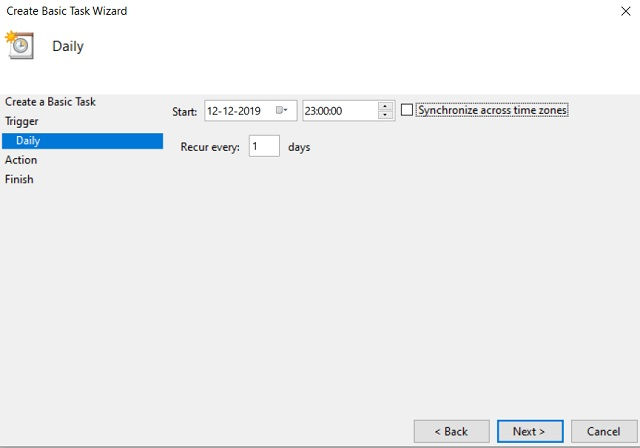
4. On the next window, choose “Daily” if you want the shutdown to happen once every day. You are free to choose other options as well based on your preference.

5. After that, enter the time and date from when the task will be active. As you can see, I have scheduled the automatic shutdown at 11 every night starting from today. Keep in mind, the time field only supports the 24-hour format so enter your data in that specific format only.
6. On the Action tab, choose “Start a program” and click on “Next”.

7. Now, paste shutdown.exe in the Program/Script field and /s /f /t 60 in the Add arguments field. Basically, /s means shutdown, /f means force-close apps and /t means timeout which is capped at 60 seconds. It means the computer will shut down every night at 11 after a timeout of 60 seconds. You can change the timeout time be changing the number of seconds.

8. Now, you are almost done. Check all the details of your task and click on the “Finish” button.

9. If you want to test if the automatic shutdown task is working as intended, click on “Task Scheduler Library” and right-click on “Automatic Shutdown”. Now, click on “Run”. If you have configured everything properly, your PC will shut down in 60 seconds.


Comments